| Rust
Repairs
Well all those year on the ranch and who knows where
else took their tole on the poor little jeepster. We ended up having to
cut out and replacing all the lower panel sections, the floor below the
rear seat and up to the back of the front seat with new metal.
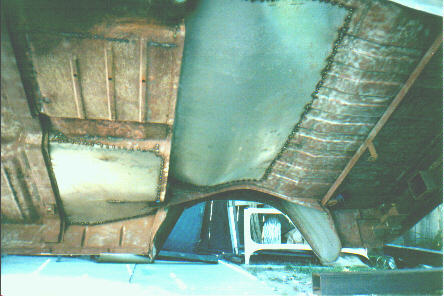 The trusty Mig welder to the rescue.
We made sure to replace all floor metal before removing the body from
the frame to place it on the rotisserie. Once the body was on the
rotisserie we sandblased the underside and applied two coats of DP-40.
After that we used some 3M Seam Sealer on all the floor seams before coating
the floor with rubberized undercoating. After-all this is going to
be a driver!
The firewall didn't come out unscathed either. I can only imagine
that the previous owner was trying to install a straight eight from the
large sized torch job of a hole he cut into the firewall.
 Under Hood Picture
We ended up replacing the firewall with a new sheet of steel for a smoothed
and finished look. The only item that will be mounted to the firewall
will be the power brake booster and NO wires will be showing in the engine
compartment.
Under Hood Picture
We ended up replacing the firewall with a new sheet of steel for a smoothed
and finished look. The only item that will be mounted to the firewall
will be the power brake booster and NO wires will be showing in the engine
compartment.
Body Work
We took the Jeepster down to bare metal with a combination
of paint stripper and a DA sander. Luckly the Jeepster had only two coats
of paint which speeded up the process.
 Jeepster stripped to bare metal
I don't care how good I clean and prep body seams, I always get rust
re-appearing in those area's so that's the main reason I welded up all
the seams and then some on the Jeepster. The added plus in my opinion
is that it smooths out the body lines and makes the vehicle look like it
has that finishing touch about it. I welded up the following seams
on the Jeepster:
a) Quarter Panel rear seams
b) Rocker Sill seams below doors
c) Cowl seam between hood and door
d) All Fender seams (Moulded in the fenders)
e) Fender Extension seams (with some minor contour changes)
f) Front fender seams (by headlights)
I also hate the look of the filler tube sticking out the quarter panel
so I added the gas door off of a VW Bug. Part of that smoothing of
the body and visual appeal.
Primer
The body was cleaned with wax and grease remover and then sprayed
with DP40 a catalyzed primer that's very durable and prevents further rust
from occurring.
The bodywork was then completed relatively easy as most of the panels
were massaged with an air straightline sander.
We then applied a second coat of DP40 to sandwhich the filler which
provided better protection from the elements.
We then applied a several coats of K-200 which is a type of filler primer.
The body was then sprayed with a light fog of black primer from a spray
can for a guide coat. The guide coat is sanded with 400 wet and dry sand
paper to locate any imperfections. Any imperfection found were then treated
with a coat of catalyzed cream filler, sanded and reprimered with K-200,
guide coated and sanded again.
 First coat of K-200 Catalyzed Primer
BACK TO TOP OF PAGE
First coat of K-200 Catalyzed Primer
BACK TO TOP OF PAGE
|